Arduino LC Studio SD Card Tutorial
Arduino Low Cost SD Card Module
The LC Studio SD Card module allows you to add data storage capability to your Arduino for a low cost. It has been around a while, so there are plenty of internet resources available.
This tutorial, in addition to providing module-specific interface information, will guide you through SD card basics that occasionally get lost in project-specific articles.
Here you will learn how to initialize, write to, and read from your SD Card using the standard Arduino SD library.
LC Studio SD Card Pin Outs
The module typically uses the standard SPI pins.
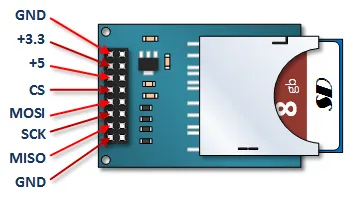
- **CS (Chip Select):** Connects to Arduino digital pin 10 (or another designated CS pin).
- **SCK (Serial Clock):** Connects to Arduino SCK pin (pin 13 on Uno/Nano).
- **MOSI (Master Out Slave In):** Connects to Arduino MOSI pin (pin 11 on Uno/Nano).
- **MISO (Master In Slave Out):** Connects to Arduino MISO pin (pin 12 on Uno/Nano).
- **VCC:** Connects to Arduino 5V (or 3.3V, check module specifics).
- **GND:** Connects to Arduino GND.
Arduino LC Studio SD Card Tutorial
This tutorial involves a single hardware setup. You will upload different sketches to demonstrate various SD card functions.
Format Your SD Card
You will need a standard SD card (not SDHC or SDXC for older libraries/boards unless specified compatible, usually 2GB or less is safest for basic examples). Format the SD Card using your computer's formatting tool. Choose **FAT16** or **FAT32** as the file system. FAT32 is common for larger cards.
Connect the Arduino SD Card Module to your Arduino
Make the following connections using the standard SPI pins for your Arduino board (pins shown are for Uno/Nano):

- Module CS to Arduino Pin 10
- Module SCK to Arduino Pin 13
- Module MOSI to Arduino Pin 11
- Module MISO to Arduino Pin 12
- Module VCC to Arduino 5V
- Module GND to Arduino GND
Note: Some modules might require 3.3V power instead of 5V. Always check your specific module's documentation.
Initializing your SD Card
Before you can use the SD card, you need to include the necessary libraries (`SD.h` and `SPI.h`) and initialize the card in your `setup()` function using `SD.begin()`. This sketch demonstrates initialization.
Copy, Paste, and Upload the Initializing Code
// Emre's Bench
// LC Studio SD Card Initializing Tutorial
// Connections: MOSI - pin 11, MISO - pin 12, SCK - pin 13, CS - pin 10 (on Uno/Nano)

#include <SPI.h>
#include <SD.h>

const int chipSelectPin = 10; // Chip Select pin for the SD card module

void setup() {
  Serial.begin(9600);
  while (!Serial) {
    ; // wait for serial port to connect. Needed for native USB port only
  }

  Serial.print("Initializing SD card...");

  // Note: The SD library requires pinMode(SS, OUTPUT) even if default SS pin isn't used.
  // On Uno/Nano, SS is pin 10, which we ARE using for CS here.
  // If using a different CS pin (e.g., 4), you still need pinMode(10, OUTPUT);
  pinMode(SS, OUTPUT); // Default SS pin must be set as Output

  if (!SD.begin(chipSelectPin)) {
    Serial.println(" initialization failed!");
    while (1); // Halt execution if initialization fails
  }
  Serial.println(" initialization done.");
}

void loop() {
  // Nothing happens in the loop for this example.
}
Test the Initializing Sample Sketch
Open the Serial Monitor (set to 9600 baud). If the SD card is inserted correctly and formatted properly, it should print "initialization done."
If it prints "initialization failed!", check your wiring, ensure the card is fully inserted, and verify the formatting (FAT16/FAT32).
Creating an SD Card File and Writing to It
This sketch demonstrates creating a new file (if it doesn't exist) or opening an existing file, and writing a line of text to it. The `myFile.flush()` command ensures the data is physically written to the card.
Copy, Paste and Upload the Creating and Writing Sketch
// Emre's Bench
// LC Studio SD Card Create and Write to File Tutorial
// Connections: MOSI - pin 11, MISO - pin 12, SCK - pin 13, CS - pin 10 (on Uno/Nano)

#include <SPI.h>
#include <SD.h>

const int chipSelectPin = 10; // Chip Select pin for the SD card module
File myFile;                  // Create a File object

void setup() {
  Serial.begin(9600);
  while (!Serial) {
    ; // wait for serial port to connect.
  }

  Serial.print("Initializing SD card...");
  pinMode(SS, OUTPUT); // Default SS pin must be set as Output

  if (!SD.begin(chipSelectPin)) {
    Serial.println(" initialization failed!");
    while (1);
  }
  Serial.println(" initialization done.");

  // Define the filename
  char myFileName[] = "MYFILE.TXT"; // Use 8.3 filename format for best compatibility

  // Check if the file already exists
  if (SD.exists(myFileName)) {
    Serial.println("MYFILE.TXT exists. Appending data.");
    // Open the file in write mode (appends data)
    myFile = SD.open(myFileName, FILE_WRITE);
    if (myFile) {
      myFile.println("Another Line of Data"); // Write a new line
      myFile.flush(); // Ensure data is written
      myFile.close(); // Close the file
      Serial.println("Appended data to MYFILE.TXT");
    } else {
      Serial.println("Error opening MYFILE.TXT for appending");
    }
  } else {
    Serial.println("MYFILE.TXT doesn't exist. Creating and writing first line.");
    // Open the file (creates if it doesn't exist)
    myFile = SD.open(myFileName, FILE_WRITE);
    if (myFile) {
      myFile.println("My 1st Line of Data"); // Write the first line
      myFile.flush(); // Ensure data is written
      myFile.close(); // Close the file
      Serial.println("Created MYFILE.TXT and wrote first line.");
    } else {
      Serial.println("Error creating or opening MYFILE.TXT");
    }
  }
   Serial.println("Done.");
}

void loop() {
  // Nothing happens in the loop
}
Test your Creating and Writing to SD Card Sketch
Follow these steps carefully:
- Start with a formatted SD Card inserted in the module.
- Upload the sketch and open your Serial Monitor (9600 baud).
- Observe the output. It should indicate it created the file and wrote the first line.
- Close the Serial Monitor, power off the Arduino, remove the SD Card, and insert it into your computer.
- Navigate to the SD card drive and find `MYFILE.TXT`.
- Open the text file. It should contain only: `My 1st Line of Data`.
- Safely eject the SD Card from your computer and reinsert it into the Arduino module.
- Power on the Arduino and open the Serial Monitor again.
- Observe the output. This time, it should indicate the file exists and it appended data.
- Close the Serial Monitor, power off, remove the SD Card, and check it on your computer again.
- Open `MYFILE.TXT`. It should now contain:
My 1st Line of Data
Another Line of Data
Reading an SD Card File Sample Sketch
In this example, we’ll read the contents of the `MYFILE.TXT` we created and print each line to the Serial Monitor.
Copy, Paste and Upload the Reading an SD Card Sample Sketch
// Emre's Bench
// LC Studio SD Card Read From File Tutorial
// Connections: MOSI - pin 11, MISO - pin 12, SCK - pin 13, CS - pin 10 (on Uno/Nano)

#include <SPI.h>
#include <SD.h>

const int chipSelectPin = 10; // Chip Select pin
File myFile;                  // Create a File object

void setup() {
  Serial.begin(9600);
  while (!Serial) {
    ; // wait for serial port to connect.
  }

  Serial.print("Initializing SD card...");
  pinMode(SS, OUTPUT); // Default SS pin must be set as Output

  if (!SD.begin(chipSelectPin)) {
    Serial.println(" initialization failed!");
    while (1);
  }
  Serial.println(" initialization done.");
  Serial.println();

  // Define the filename to read
  char myFileName[] = "MYFILE.TXT"; // Use 8.3 format

  Serial.print("Reading ");
  Serial.print(myFileName);
  Serial.println("...");
  Serial.println();

  // Open the file for reading:
  myFile = SD.open(myFileName, FILE_READ);

  if (myFile) {
    Serial.println("File content:");
    // Read from the file until there's nothing else in it:
    while (myFile.available()) {
      Serial.write(myFile.read()); // Print character by character
    }
    // Close the file:
    myFile.close();
    Serial.println("\nFinished reading.");
  } else {
    // If the file didn't open, print an error:
    Serial.print("Error opening ");
    Serial.println(myFileName);
  }
   Serial.println("\nDone.");
}

void loop() {
  // Nothing happens in the loop
}
Test the Reading from File Sketch
After uploading, open the Serial Monitor. It should initialize the card and then print the contents of `MYFILE.TXT`, which should include both lines you wrote previously.