YWRobot LCM1602 IIC V1 LCD Arduino Tutorial
An I2C LCD
This LCD has an I2C interface. I like that. I like quick and easy implementation and I like having pins left over for other things. The I2C interface itself is actually a small daughter board (often called an I2C backpack) that has been soldered onto a standard HD44780-compatible 16x2 character LCD.
In fact, this YWRobot backpack board can sometimes be purchased separately and connected to the the LCD of your choice.
Finding One
The searches below will most certainly bring you to listings that include the daughter board seen here. However, they will also some other stuff. If your intent is to copy what I’ve done here, I suggest playing close attention to the advertisement photos.
YWRobot LCM1602 IIC V1 LCD Pin Outs
The picture below provides both a front view and a rear view of the LCD with the I2C backpack module attached.
As you can see, the pins are accessed via the 4-pin header on the backpack.
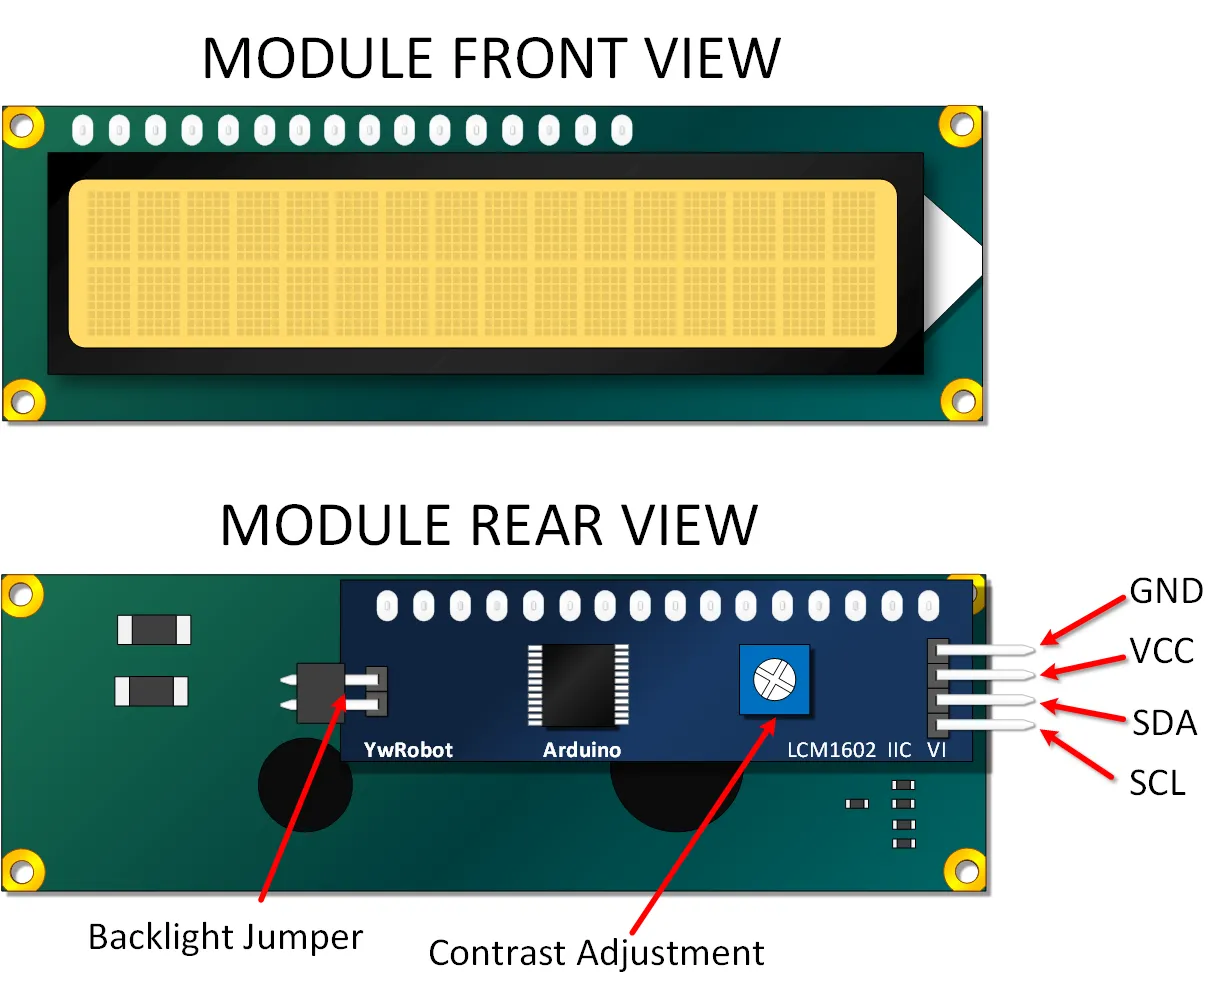
Key features:
- Pins: GND, VCC, SDA (Data), SCL (Clock).
- Contrast Potentiometer: Use a small screwdriver to adjust this until you can clearly see the character blocks (usually visible even before text is displayed).
- Backlight Jumper: Removing this jumper turns the backlight off. Connecting it (usually the default) keeps the backlight on. You cannot control the backlight via software with this specific backpack without modification.
Arduino YWRobot LCM1602 IIC V1 Tutorial
Get the Necessary Library
To use this I2C LCD with Arduino, you need a compatible LiquidCrystal I2C library. A commonly used one is the library by Frank de Brabander.
- In the Arduino IDE, go to Sketch > Include Library > Manage Libraries...
- Search for "LiquidCrystal I2C".
- Install the library by "Frank de Brabander". (The original tutorial mentioned version 1.2.1, but the latest version should generally work).
If you are new to adding libraries, visit the Arduino Library Guide.
Connect your Arduino to the LCD
It's just a matter of using four jumper wires between your Arduino and the LCD module's I2C pins.
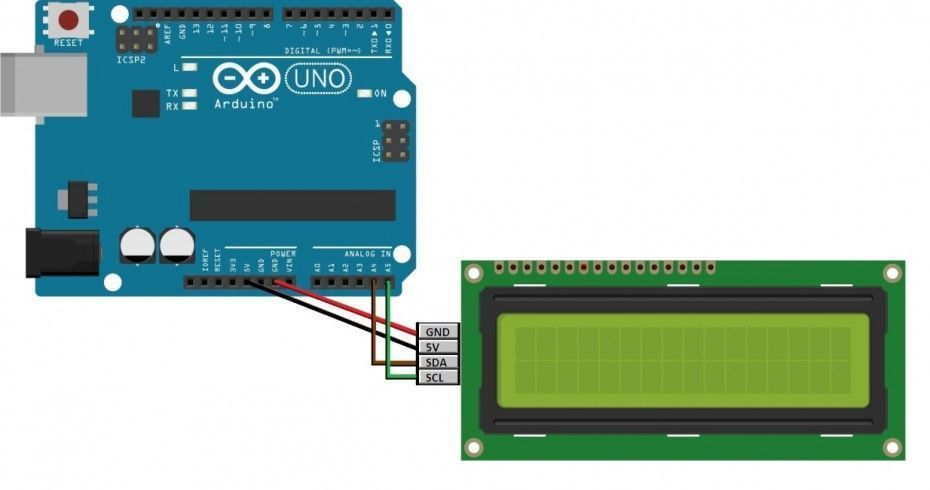
- LCD GND to Arduino GND
- LCD VCC to Arduino 5V
- LCD SDA to Arduino A4 (SDA)
- LCD SCL to Arduino A5 (SCL)
Upload and Run the I2C Scanner Sketch
Important: Find Your LCD's I2C Address!
You would think that all of these modules would come with the I2C address clearly marked, but they often don't. Worse, the address mentioned by the seller might be incorrect.
Common addresses for these modules are 0x27 or 0x3F, but yours could be different. To avoid frustration, run an I2C scanner sketch first to find the correct address for your specific module.
You can find a standard I2C Scanner sketch easily online, or use this one:
// I2C Scanner Sketch
// Scans the I2C bus and reports addresses found on the Serial Monitor

#include <Wire.h>

void setup() {
  Wire.begin();
  Serial.begin(9600);
  while (!Serial); // Wait for Serial port to connect (needed for Leonardo/Micro)
  Serial.println("\nI2C Scanner");
}

void loop() {
  byte error, address;
  int nDevices;

  Serial.println("Scanning...");
  nDevices = 0;
  for(address = 1; address < 127; address++ ) {
    // The Wire.endTransmission() function returns 0 if a device acknowledges the address.
    Wire.beginTransmission(address);
    error = Wire.endTransmission();

    if (error == 0) {
      Serial.print("I2C device found at address 0x");
      if (address < 16) {
        Serial.print("0");
      }
      Serial.print(address, HEX);
      Serial.println(" !");
      nDevices++;
    } else if (error == 4) {
      Serial.print("Unknown error at address 0x");
      if (address < 16) {
        Serial.print("0");
      }
      Serial.println(address, HEX);
    }
  } // end for loop

  if (nDevices == 0) {
    Serial.println("No I2C devices found\n");
  } else {
    Serial.println("Scan complete.\n");
  }

  delay(5000); // Wait 5 seconds for next scan
}
Upload this sketch, open the Serial Monitor (set to 9600 baud), and note the address reported (e.g., `0x27` or `0x3F`). You will need this for the next step.
Copy, Paste and Upload the Tutorial "Hello World" Sketch
Copy the sketch below, making sure to **replace `0x27` in the `LiquidCrystal_I2C lcd(...)` line with the actual address you found** using the I2C scanner.
// Emre's Bench - YWRobot LCM1602 IIC LCD Tutorial

#include <Wire.h>
#include <LiquidCrystal_I2C.h> // Include the installed library

// Initialize the LCD object.
// *** IMPORTANT: Replace 0x27 with the actual I2C address you found! ***
// The other parameters (2, 1, 0, 4, 5, 6, 7, 3, POSITIVE) are specific
// to the PCF8574 chip commonly used on these backpacks and the standard
// pin mapping. They usually don't need to be changed for this type of module.
LiquidCrystal_I2C lcd(0x27, 2, 1, 0, 4, 5, 6, 7, 3, POSITIVE);

void setup()
{
  // Initialize the LCD with 16 characters and 2 lines
  lcd.begin(16, 2);

  // Turn on the backlight (if the jumper is installed)
  lcd.backlight();

  // --- Print messages to the LCD ---

  // Set cursor to column 0, line 0 (top line)
  lcd.setCursor(0, 0);
  lcd.print("Hello World!");

  // Set cursor to column 0, line 1 (bottom line) - Adjusted position
  lcd.setCursor(0, 1);
  lcd.print("Emre's Bench!"); // Changed text
}

void loop()
{
  // Nothing needed in the loop for this simple example
  // The text will remain on the display.
}
After uploading, adjust the contrast potentiometer on the back of the module until the text is clearly visible.