Arduino Nokia 5110 LCD with U8GLIB Tutorial
Nokia 5110 with U8GLIB
The Nokia 5110 display has long been an Arduino Hobbyist favorite and a search of the internet will show that there are tons of different ways to drive this device. This tutorial focuses on the freely available U8GLIB graphics library.
One of the reasons I like this library is because it makes it simple for me to adopt a different display for a project without a lot of code changes.
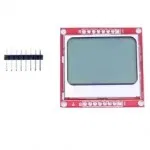
Getting Your Nokia 5110
Nearly anyone selling Arduino stuff is selling one of these. If you can’t find one, you can try one of these.
Level Shifter Recommended!
The Nokia 5110 is a 3.3 volt device. While there are examples online of people connecting it directly to 5V Arduino logic pins, this can damage the display over time.
Using a logic level shifter between your 5V Arduino and the display's logic pins (RST, CE/CS, DC, DIN, CLK) is highly recommended for reliable and long-lasting operation. The display's VCC pin should be connected to the Arduino's 3.3V output.
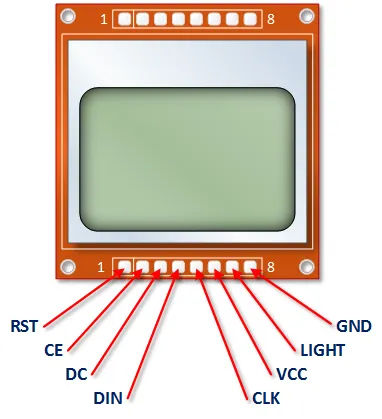
Nokia 5110 Pin Outs
There are a few varieties of this module out there. Mine are labeled as you see below. Others should work just fine with this tutorial if you map your pins correctly.
Remember, VCC is 3.3 Volts. The LIGHT (Backlight) pin can be connected to GND for full brightness, left disconnected, or controlled via PWM through a current-limiting resistor (e.g., 330 ohm) connected to an Arduino digital pin.
Arduino Nokia 5110 U8GLIB Tutorial
Get The U8GLIB Library
As mentioned in the SH1106 tutorial, the original U8glib library is no longer actively maintained, and U8g2 is the recommended successor. However, this tutorial uses the original U8glib constructor.
You can download the original library from the archived Google Code page or search online. Install it via the Arduino IDE's Library Manager (Sketch > Include Library > Add .ZIP Library...). Refer to the Arduino guide if needed.
Connect the Arduino and the Nokia 5110
The diagram below shows connections using a generic logic level shifter, which is highly recommended. Connect the Arduino's 5V to the HV (High Voltage) side of the shifter and the Arduino's 3.3V to the LV (Low Voltage) side. Connect both GNDs.
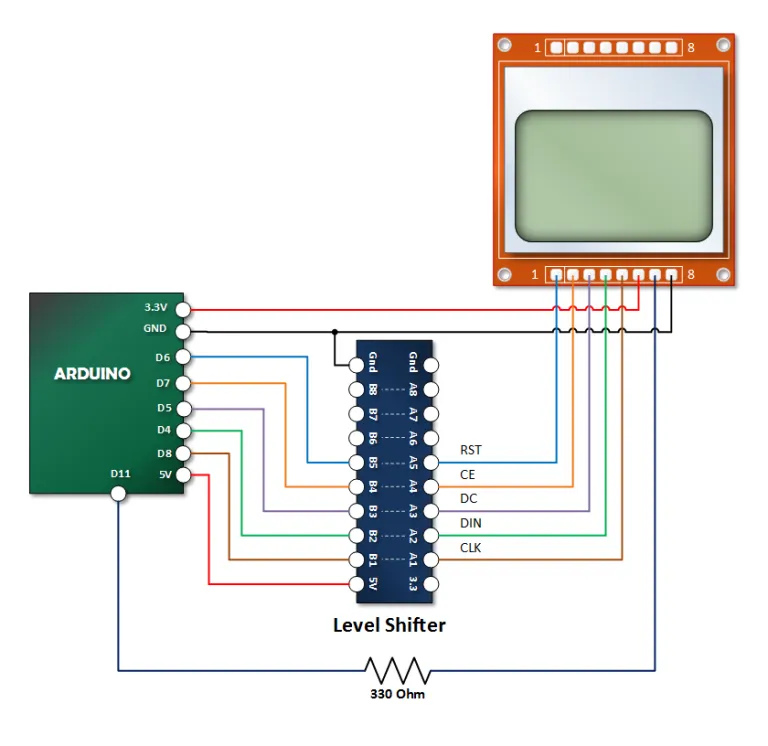
- Arduino 3.3V -> Level Shifter LV & Display VCC
- Arduino 5V -> Level Shifter HV
- Arduino GND -> Level Shifter GND & Display GND
- Arduino D8 (CLK) -> Level Shifter HV Side -> Level Shifter LV Side -> Display Clk
- Arduino D4 (DIN) -> Level Shifter HV Side -> Level Shifter LV Side -> Display Din
- Arduino D7 (CE) -> Level Shifter HV Side -> Level Shifter LV Side -> Display CE
- Arduino D5 (DC) -> Level Shifter HV Side -> Level Shifter LV Side -> Display DC
- Arduino D6 (RST) -> Level Shifter HV Side -> Level Shifter LV Side -> Display RST
- Arduino D11 (PWM optional) -> 330 Ohm Resistor -> Display LIGHT (or connect LIGHT directly to GND for full brightness)
Copy, Paste and Upload the Nokia 5110 U8Glib Sketch
This sketch uses the U8Glib library. Using this library effectively requires the use of a ‘Picture Loop’.
// Emre's Bench
// Arduino Nokia 5110 U8Glib Tutorial

#include "U8glib.h"

// Define the backlight pin (optional, use PWM pin like 11)
#define BACKLIGHT_PIN 11

// Initialize U8glib for Nokia 5110 (PCD8544 controller) using Software SPI
// Pinout: CLK = 8, DIN(MOSI) = 4, CE(CS) = 7, DC = 5, RST = 6
U8GLIB_PCD8544 u8g(8, 4, 7, 5, 6);

// Function to draw content on the display
void draw() {
  // Set the font
  u8g.setFont(u8g_font_profont11); // Choose a font available in U8glib

  // Draw strings at specified coordinates (x, y)
  u8g.drawStr(0, 15, "Nokia 5110..");
  u8g.drawStr(10, 35, "HELLO!!!!"); // Adjusted X position slightly
}

void setup() {
  // Set up the backlight pin (optional)
  pinMode(BACKLIGHT_PIN, OUTPUT);

  // Set Backlight Intensity (0 is fully bright, 255 is off)
  // Using analogWrite for PWM control if connected to a PWM pin
  analogWrite(BACKLIGHT_PIN, 80); // ~1/3 brightness

  // If not using PWM, you could just turn it fully on or off:
  // digitalWrite(BACKLIGHT_PIN, LOW); // Assuming LOW connects LIGHT pin to GND = ON
  // or connect LIGHT pin directly to GND on the breadboard.

  // Flip screen if required (uncomment if text is upside down)
  // u8g.setRot180();
}

void loop() {
  // U8glib Picture Loop: draws the content frame by frame
  u8g.firstPage();
  do {
    draw(); // Call the drawing function
  } while (u8g.nextPage());

  // No delay needed here, the picture loop handles refresh timing
}
Test Your Sketch
The results will be nearly immediate. You will see a text display with a lit back light.