TMP36 Arduino Thermometer Tutorial
Easy to Use Temperature Sensor
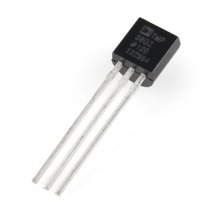
It really doesn’t get much easier to measure temperature with an Arduino than with Analog Device’s TMP36 temperature sensor. Supply it 5 volts and ground from your Arduino, connect it’s output to an analog pin, add a little code and you’re measuring temperature.
Want another option like this? Try the LM35
Power Requirements
The TMP36 needs power that is between 2.7 and 5.5 volts. On your Arduino, you have two pins that supply voltages in this range. The first is the 3.3V output and the other is the 5V output. In my test, I used the 5 volt output.
Accuracy
The manufacturer’s data sheet indicates that the typical accuracy is plus or minus one degree C. The worse case accuracy is stated as +/- 2 degrees C.
The Range
This sensor is suppose to have a range from -40 degrees C to +125 degree C. For my American brothers (who are going metric inch by inch), that’s from -40 to 257 degrees F.
The Output (or Scale Factor)
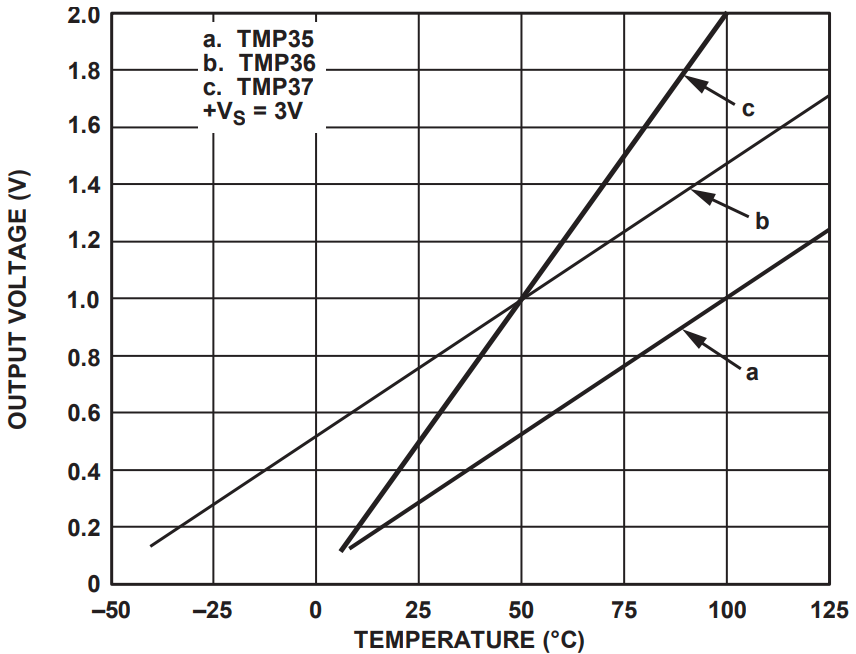
Zero degrees Celsius (ice point) is 500 mV (0.5V). This is often referred to as the offset.
Every degree of change from that point will either increase or decrease this value by 10 mV (the scale factor). So at five degrees Celsius, the device would output 550 mV. At a negative 10 degrees Celsius, the output will be 400 mV.
The TMP36 Pin outs
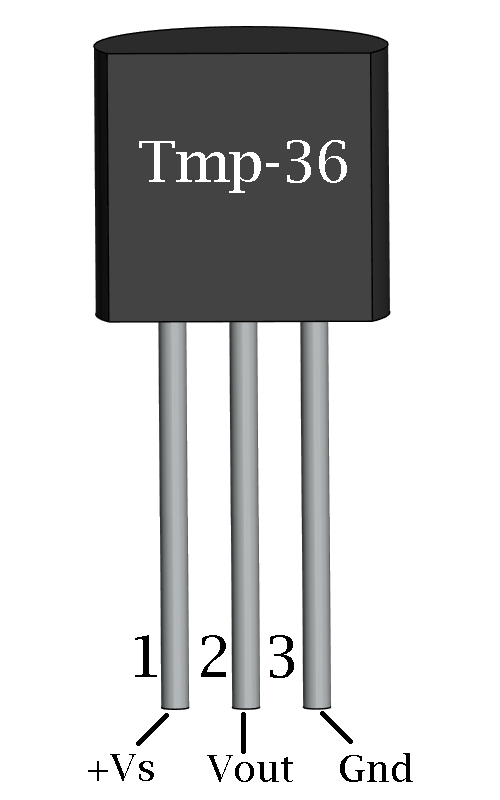
The TMP36 pinouts are identified in the diagram on the left (when looking at the flat face):
- Pin 1 (Left): +Vs (Connect to 3.3V or 5V)
- Pin 2 (Center): Vout (Connect to Arduino Analog Pin)
- Pin 3 (Right): GND (Connect to Arduino GND)
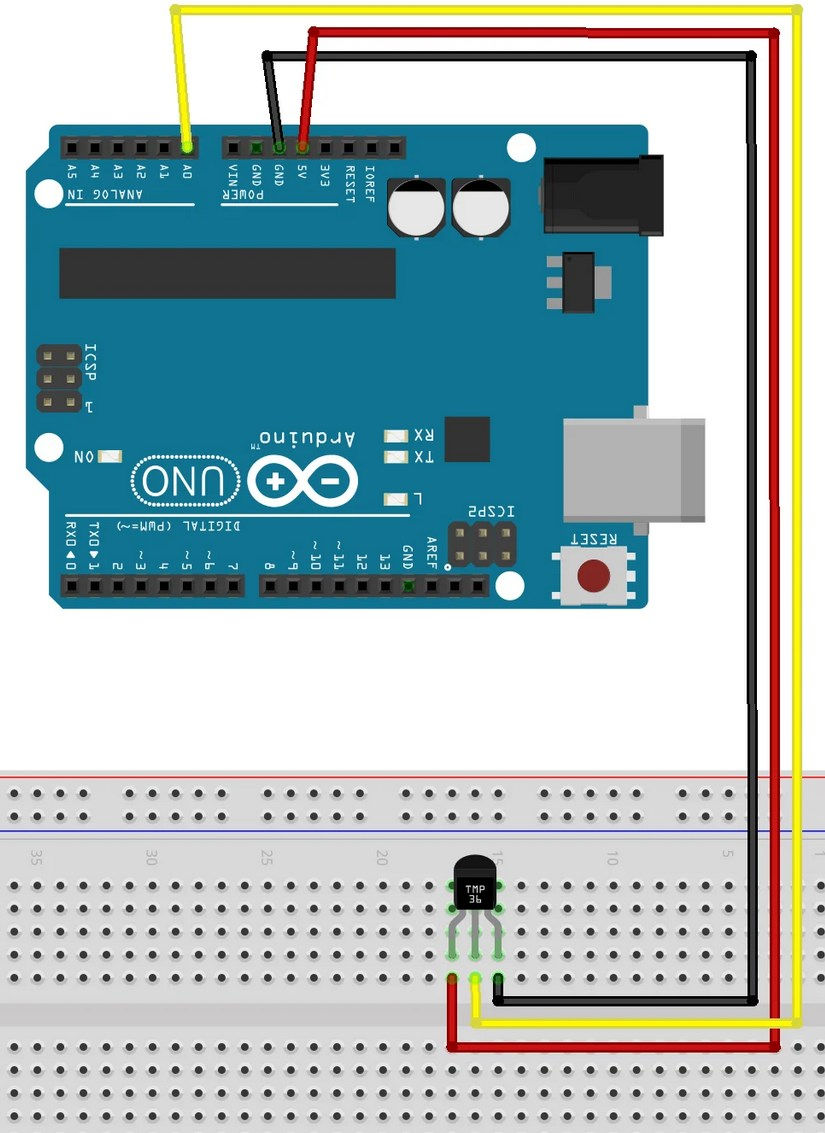
TMP 36 Connections
As mentioned before, you need just three connections and a USB cable to your computer. See below.
Comments About My Code
- The code reads the analog value from the sensor.
- It converts the raw ADC value (0-1023) to millivolts. Assuming a 5V reference voltage on the Arduino, the formula is `(RawValue / 1023.0) * 5000;`.
- It then converts the millivolts reading to Celsius using the sensor's specifications: `(Voltage - 500) / 10;` (Subtract the 500mV offset for 0°C, then divide by the 10mV/°C scale factor).
- Finally, it converts Celsius to Fahrenheit: `(tempC * 1.8) + 32;`.
The Code
/*
 Emre's Bench - TMP36 Thermometer Tutorial
 Reads temperature from a TMP36 sensor and prints it to the Serial Monitor
 in Celsius and Fahrenheit.
*/

const int analogIn = A0; // Analog pin connected to the TMP36 Vout pin

int RawValue = 0;        // Variable to store raw ADC reading
double Voltage = 0;      // Variable to store voltage in millivolts
double tempC = 0;        // Variable to store temperature in Celsius
double tempF = 0;        // Variable to store temperature in Fahrenheit

void setup() {
  // Initialize serial communication at 9600 bits per second:
  Serial.begin(9600);
}

void loop() {
  // Read the analog input pin:
  RawValue = analogRead(analogIn);

  // Convert the analog reading (0-1023) to millivolts (0-5000mV):
  // Assumes Arduino Vref = 5.0V (5000mV)
  Voltage = (RawValue / 1024.0) * 5000; // Use 1024.0 for better precision

  // Convert millivolts to temperature Celsius:
  // (Sensor output is 10mV/°C with a 500mV offset for 0°C)
  tempC = (Voltage - 500.0) / 10.0;

  // Convert Celsius to Fahrenheit:
  tempF = (tempC * 9.0 / 5.0) + 32.0; // Use floating point for calculation (9.0/5.0 = 1.8)

  // Print the results to the Serial Monitor:
  Serial.print("Raw Value = ");
  Serial.print(RawValue);

  Serial.print("\t Millivolts = ");
  Serial.print(Voltage, 0); // Print millivolts with 0 decimal places

  Serial.print("\t Temp C = ");
  Serial.print(tempC, 1); // Print Celsius with 1 decimal place

  Serial.print("\t Temp F = ");
  Serial.println(tempF, 1); // Print Fahrenheit with 1 decimal place

  // Wait 500 milliseconds before the next loop:
  delay(500);
}