MingHe B3603 User Manual
Features and Specifications
The MingHe B3603 is a constant voltage, constant current step down (or buck) power supply.
It accepts inputs from 6 to 40 Vdc and provides outputs from 0 to 40 Vdc.
It features a four digit display that can display the following:
- Voltage limit set point
- Current limit set point
- Voltage output – real time
- Current output – real time
- Amp Hours – accumulated since being turned on.
- Power – in watts, real time
- Navigation to various set up menus and memory menus.
Electrical Specifications
| Input Voltage | 6 to 40 Vdc |
| Output Voltage | 0 to 36 Vdc |
| Output Current | 0 to 2A with no cooling. 0 to 3A with cooling |
| Voltage Display Resolution | 0.01 Vdc |
| Current Display Resolution | 0.001A |
| Power Display Resolution | 0.001 Watt |
| Amp Hour Display Resolution | 0.001 AH |
| Efficiency | Up to 92 percent |
| Output Ripple | <= 50mV |
| Operating Temperature Range | -40 deg C to +85 deg C |
| Switching Frequency | 150 kHz |
| Short Circuit Protection | Set by constant current limit |
| Reverse Polarity Protection | None. Install a diode if necessary. |
Physical Dimensions
| Length | 66mm |
| Height | 21mm |
| Width | 50mm |
Interface and Connections
The illustration below shows the various displays, controls and connections available on the B3603 and is followed by a basic functional description of each.

Input – DC voltage source connects here. Accepts between 6 and 40 volts dc. The input voltage must be higher than the desired output voltage. Also ensure that you use the correct polarity as there is not protection.
Output – DC Load or device that you want to power connects here. The output is adjustable from 0 to 36 Vdc. The output voltage must be lower than the input voltage.
Note On Input and Output – These are non-isolated. That is to say that the negative terminals for both the input and output are the same electrical point.
Display – When the output is off, it will show the set points for both voltage and current. When the output is on, it shows that actual voltage and current outputs.
The position of the decimal point is what determines whether the indication is for voltage or current. In more advance modes, the display will also show the power and amp hours.
See the illustrations and explanations below.
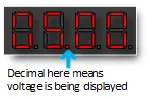
Voltage is being displayed when the second decimal from the left is lit.
If the ‘Out’ LED is lit, then the actual voltage output is being displayed
If the ‘Out’ LED is off, the voltage set point is being displayed.

Current is being displayed when the first decimal from the left is lit.
If the ‘Out’ LED is lit, then the actual current output is being displayed
If the ‘Out’ LED is off, the current set point is being displayed.
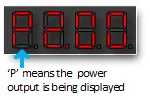
If the first letter of the display in ‘P’, then actual power output is being shown.
The value being displayed is in watts. Thus, "P2.00" is equal to 2.00 watts and P.200 is equal to .200 watts.
Watts of course meaning voltage times current.
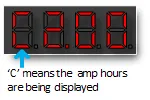
If C is the first letter of the display, then amp hours are being shown.
These are cumulative since power was applied.
Thus a display of two means that two amp hours are have been drawn from the supply since it was last turned on.
CV LED – When lit, the power supply is in the Constant Voltage mode. This means the output voltage is at the value set and it is current that is varying.
CC LED – When lit, the B3603 is in the Constant Current mode. This means the current limit has been reached and voltage is varying.
OUT LED – When lit, the power supply is on and is supplying power. When off, its output is off.
SET BUTTON – If the OUT LED is on, pressing the set button will turn the B3603 off.
If OUT LED is off, pressing the set button will cause the display to cycle between the voltage and current set points.
OK BUTTON – If the OUT LED is off, pressing the OK button will turn the power supply on.
If the OUT LED is on and display is showing a fixed value, a quick press will cycle to the next value.
If the OUT LED is on, pressing the OK button for more than a second will cause the display to enter a mode where it automatically cycles between the various power supply values or will cause the display to enter a mode where is displays a fixed value.
UP ARROW – Pressing this button will increase the set point of what ever value is being display.
A quick single press, will increase the value by one digit. Holding the button down will cause the value to increase rapidly.
The set points can be changed with the power output on or off.
DOWN ARROW – Pressing this button will decrease the set point of the value being display.
A quick single press, will decrease the value by one digit. Holding the button down will cause the value to decrease rapidly.
Set points can be decreased with the power output on or off.
User Selectable Features
The B3603 Constant Current, Constant Voltage Step Down power supply offers three user configurable features through its functions menu. The features include:
- Function 0 – Allows user to choose whether or not the output is enabled when power is supplied to the step down converter.
- Function 1 – User may select whether or not to display power and amp hours.
- Function 2 – User can choose whether or not to cycle between values as a power up option.
Accessing the Functions Menu
The Power Supply’s Functions Menu is accessed by applying power with the ‘OK Button’ pressed. With the ‘OK Button’ still pressed after power is applied the display will cycle between three values that represent the three user configurable options.
The steps to accessing the functions menu are as follows:
- Turn off or remove power to the B3603 power supply.
- Press and hold the ‘OK Button’.
- With the ‘OK Button’ still pressed, turn on or apply power to the power supply. Keep the ‘OK Button’ pressed!
- With power applied to B3603 and the ‘OK Button’ still pressed, the display will cycle between three values. The values are ‘–0–‘, ‘–1–‘, and ‘–2–‘.
Releasing the ‘OK Button’ on one of these values will toggle the user selectable state.
For example, Function 0 allows the user to choose whether or not the output is automatically on when power is applied. If the power supply were configured to immediately provide an output when power is first applied, releasing the ‘OK Button’ would cause the B3603 to toggle to the state where output is off when power is first applied.
Automatic Power Output Option
The B3603 Step Down Converter allows the user select whether or not the power supply provides an output when first powered up.
If placed in a mode where the B3603 automatically applies power output when powered up, the supply will provide that power based on the last voltage and current settings.
If the B3603 is placed in a mode where the power output is first off, it will be necessary to enable the output by pressing the ‘OK Button’ while after power is applied the the B3603.
In either state, pressing the ‘SET Button’ will turn the power output off.
Determine the Power Output Configuration
It is recommended that the user first determine the Power Output state before changing the configuration. The process is simple.
- Remove or turn off power to the power supply.
- Apply or turn on power to the power supply.
- Note whether or not the ‘OUT LED’ is illuminated.
If the ‘OUT LED’ is illuminated, the power supply is set up to automatically provide an output when first turned on.
If the ‘OUT LED’ is not illuminated, the power supply is set so that output is off when the B3603 is first energized.
Changing the Power Output Configuration
The steps to change the power output option are detailed in the procedure below:
- Turn off or remove power to the B3603 power supply.
- Press and hold the ‘OK Button’.
- With the ‘OK Button’ still pressed, turn on or apply power to the power supply. Keep the ‘OK Button’ pressed!
- With power applied to B3603 and the ‘OK Button’ still pressed, the display will cycle between three values. The values are ‘–0–‘, ‘–1–‘, and ‘–2–‘.
- Release the ‘OK Button’ when the display reads ‘–0–‘. The power output configuration will have been changed.
Note – When the ‘OK Button’ is released, the display will either indicate ‘–y–‘ or ‘–n–‘. If the display indicates ‘–y–‘ when the ‘OK button’ is released, it means that output will be automatically turned on when the power supply is energized. If the display indicates ‘–n–‘ when the ‘OK Button’ is released, the buck power supply will have its output disabled when it is first energized.
Power and Amp Hour Display Option
In addition to the default current and voltage displays, the B3603 can be set up so that it will also display both the power being output and the amp hours accumulated output since the last time the B3603 was powered on.
With respect the amp hour display, it is important to note that turning the output off with the “SET Button” will not reset the counter to zero. Instead, turning the output off will simply paused counting. Turning the output back on via the “OK Button” will cause counting of amp hours to resume.
In other words, the Amp Hour display is only reset by cycling power to the B3603.
Setting The Power and Amp Hour Display Option
Enabling or disabling the power and amp hour displays must be done through the User Selectable Features menu. This procedure for setting this option is as follows:
- Turn off or remove power to the B3603 power supply.
- Press and hold the ‘OK Button’.
- With the ‘OK Button’ still pressed, turn on or apply power to the power supply. Keep the ‘OK Button’ pressed!
- With power applied to B3603 and the ‘OK Button’ still pressed, the display will cycle between three values. The values are ‘–0–‘, ‘–1–‘, and ‘–2–‘.
- Release the ‘OK Button’ when the display reads ‘–1–‘. The option for automatic display cycling will have been changed.
Note – When the ‘OK Button’ is released, the display will briefly flash either ‘–y–‘ or ‘–n–‘. If ‘–y–‘ is flashed, the display will show power and amp hours. If ‘–n–‘ is flashed, the display will only display voltage and current.
Automatic Cycling Display Option
The display for the B3603 power supply may be configured so that it automatically cycles between voltage and current values, or it may be configured so that the value being displayed remains fixed until the user quickly presses the ‘OK button’.
The choice between an fixed or an automatically cycling display may be selected as a default power up option or it may be made when unit is on and the output is enabled.
Key Point – Display cycling, if enabled, only occurs when the output is enabled.
Choosing the Default Cycling Display Option
Choosing a fixed or cycling display as a default power option is done by accessing the user selectable features menu. The following is a step by step procedure for changing this option through this menu.
- Turn off or remove power to the B3603 power supply.
- Press and hold the ‘OK Button’.
- With the ‘OK Button’ still pressed, turn on or apply power to the power supply. Keep the ‘OK Button’ pressed!
- With power applied to B3603 and the ‘OK Button’ still pressed, the display will cycle between three values. The values are ‘–0–‘, ‘–1–‘, and ‘–2–‘.
- Release the ‘OK Button’ when the display reads ‘–2–‘. The option for automatic display cycling will have been changed.
Note – When the ‘OK Button’ is released, the display will briefly flash either ‘–y–‘ or ‘–n–‘. If ‘–y–‘ is flashed, the display will cycle when the output is enabled. If ‘–n–‘ is flashed, the display will indicate the voltage output.
Choosing the Cycling Display During Operation
A cycling display of values may be started or stopped when the power supply is on and the output is enabled.
This is done by pressing the ‘OK button’ for more than one second.