Arduino ADS1115 Differential Voltmeter Tutorial
A 16 Bit Differential Measurement
If you build enough Arduino projects, you will eventually need to make a differential voltage measurement. That is to say, you will need to make a measurement where neither side of the measurement is at the Arduino ground potential.
The strength of the ADS1115 Analog to Digital Converter (ADC) is not only in its ability to make this measurement, but to do so with 16 bits of resolution.
Another benefit is that in this differential mode, you can make a negative voltage measurement.
This brief tutorial will show how this measurement is made.
If you’re new to the ADS1115, you may wish to read my first article on the device. It discusses the 16 bit resolution, scale factor and other important device aspects.
ADS1115 Arduino Differential Measurement Tutorial
You’re going to want to find a battery of some sort for this tutorial that has a cell voltage of less than five volts.
Download and Install the Adafruit ADS1X15 Library
You will need the Adafruit ADS1X15 Library.
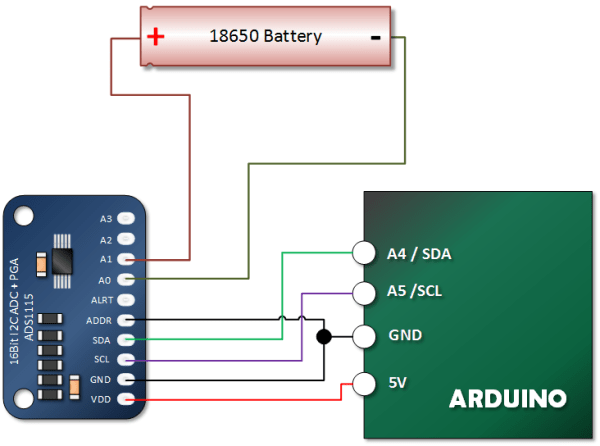
Connect the ADS1115 to Your Arduino and a Battery
The set up is simple. That said, exercise some care if you are using a breadboard. I once shorted battery terminals together using one ( I was tired ). The result was not pretty.
Copy Paste and Upload the Arduino ADS1115 Sample Sketch
#include <Wire.h>
#include <Adafruit_ADS1015.h>

Adafruit_ADS1115 ads;  // Declare an instance of the ADS1115

int16_t rawADCvalue;  // The is where we store the value we receive from the ADS1115
float scaleFactor = 0.1875F; // This is the scale factor for the default +/- 6.144 Volt Range we will use
float volts = 0.0; // The result of applying the scale factor to the raw value

void setup(void)
{
  Serial.begin(9600);
  ads.begin();
}

void loop(void)
{
  // Read the difference between AIN0 and AIN1
  rawADCvalue = ads.readADC_Differential_0_1();
  volts = (rawADCvalue * scaleFactor)/1000.0; // Convert mV per bit to V

  Serial.print("Raw ADC Value = ");
  Serial.print(rawADCvalue);
  Serial.print("\tVoltage Measured = ");
  Serial.println(volts, 6); // Print voltage with 6 decimal places
  Serial.println();

  delay(1000);
}
Verify Your Tutorial Output
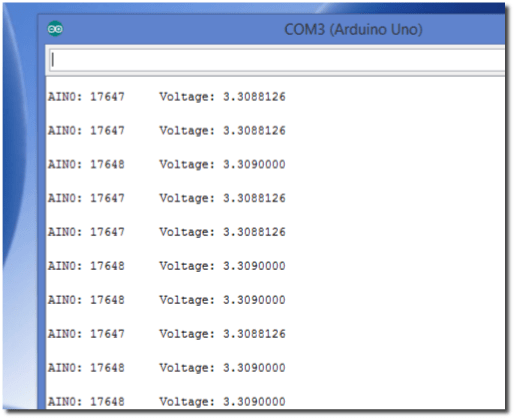
Measuring my fully charged 18650, I ended up with remarkably stable results. See if you received the same.
Notice how rock steady the result is. The difference between readings is less than one millivolt.
Now, what’s hard to determine is if that fluctuation is due to the 3.3 volt output from the Arduino, the ADS1115 or a combination of the two.
Never-the less, what we clearly have is a measurement that is very repeatable (precise). In fact, repeat-ability is often a lot more useful in measurements than accuracy. We can quantify the error in a very repeatable measurement and apply a little math to make it very accurate.
When the measurement is not very precise, we are stuck with a degree of uncertainty that is very difficult to correct for.