Simple Arduino Voltmeter
The Most Basic Way to Measure Voltage

The Arduino Uno has six analog input pins numbered A0 through A5.
These pins measure voltages from zero to five volts DC.
What gets communicated by the Arduino microprocessor is a measurement that indicates anywhere between 0 and 1023, where:
- 0 = 0 volts
- 1023 = 5 volts
This article shows how to make the most basic Arduino voltage measurement.
Connecting your Arduino Voltmeter
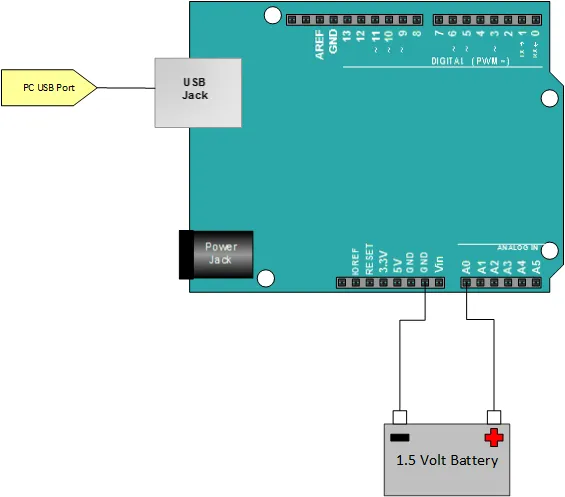
Fundamentally all you need to do is connect your Arduino to whatever it is you’re trying to measure. You will do this through your A0 pin and one of your ground pins. A small battery that is less than 5 volts would be great to connect to for this mini-project.
IMPORTANT NOTE

See that Arduino Ground at the negative side of the battery? This is perfectly OK.
That said, it is not a good idea to introduce a ground into a circuit if you’re not certain what that ground will do.
The Code
There two notable things going on here.
- We’re scaling the digital value that the Arduino communicates as a measurement result. We divide our “RawValue” by 1023 and multiply it by five.
- With the “
Serial.println(Voltage,5)” statement, we’re asking the serial monitor to give us a result that shows five digits after the decimal point (originally 3 in the text, but 5 in the code example - using 5 here).
/*
The simplest voltmeter
*/
const int analogIn = A0;

int RawValue = 0;
float Voltage = 0;

void setup() {
  pinMode(analogIn, INPUT);
  Serial.begin(9600);
}

void loop() {
  RawValue = analogRead(analogIn);
  // Note: Original used 1024.0, but text says 1023. Using 1024.0 as it's more common for full range mapping.
  Voltage = (RawValue * 5.0) / 1024.0; // scale the ADC
  Serial.print("Raw Value = "); // shows pre-scaled value
  Serial.print(RawValue);
  Serial.print("\t Voltage = "); // shows the voltage measured
  Serial.println(Voltage, 5); // 5 digits after decimal point (as per original code example)
  delay(500); // 1/2 sec so your display doesnt't scroll too fast
}
Accuracy and Precision of the Voltmeter
There are two big things that affect the accuracy of this voltmeter.
- When the Arduino provides a result between 0 and 1023, it fundamentally divides that five volteage range of the measurement up into 1024 steps (0 counts as a step). If you were to divide 5 volts up into 1024 steps, you would find that each step (or LSB - Least Significant Bit) represents 5 / 1024 ≈ 0.00488 volts. In other words, the Arduino is only capable of seeing a change of approximately 5 mV. Said another way, the Arduino analog input has ~5 mV of resolution.
- The accuracy of the Arduino in this mini-project is very much dependent of the accuracy of the power supply (which provides the 5V reference by default). In one of my tests, I used the computer USB cable to provide power and in another case, I used the a nine volt wall wart.