INA219 Arduino Current Sensor Voltmeter Tutorial: Quick Start
Functional Description
This is really a cool little device that not only allows you to measure current, but voltage as well. With a little multiplication, you can even measure power.
In terms of voltage, you get to blow right past the Arduino 5 volt limitation. In fact, you can measure up to 26 Volts DC.
At +/- 3.2A, current measurement range is suitable for most smaller measurements. In other words, you can measure in excess of 75 watts of power.
The device is readily available from the big name outlets.
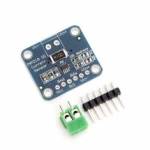
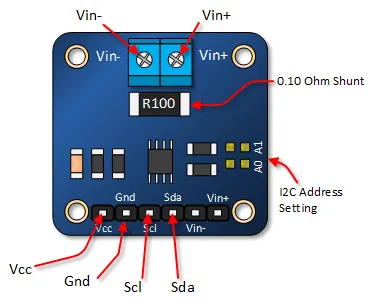
INA219 Current and Voltage Sensor Module Pin Outs
The image and table below detail some of module feature; including the pin outs.
INA219 Arduino Current and Voltage Sensor Tutorial
Get the Necessary Library
Adafruit (one of my favorite suppliers) has put together a library that makes working with the INA219 a snap. You will need to download this library. It can be found HERE.
If you are unfamiliar with installing Arduino libraries, I suggest that you read this article.
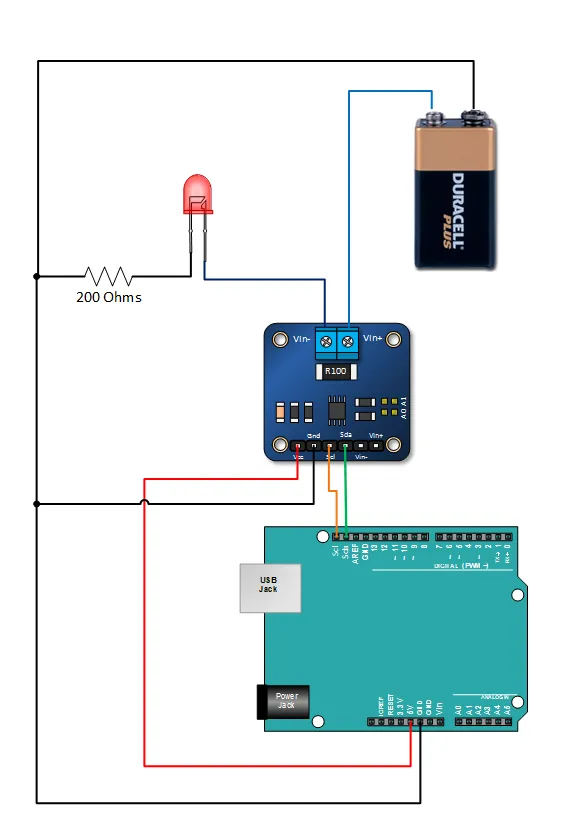
Connect Your Arduino As Shown
You will need a few other components in addition to your Arduino and INA219. These parts in include a 200 ohm resistor, a 5mm LED and a 9 volt battery.
Connect them as shown.
Copy, Paste and Upload the INA219 Arduino Tutorial Sketch
This sketch will allows you to test your INA219. The Adafruit Arduino library you downloaded also includes a sample and should also be run. Keep in mind that the Adafruit library uses a different baud rate on the serial monitor.
#include <Wire.h>
#include <Adafruit_INA219.h> // You will need to download this library

Adafruit_INA219 sensor219; // Declare and instance of INA219

void setup(void)
{
  Serial.begin(9600);
  sensor219.begin();
}

void loop(void)
{
  float busVoltage = 0;
  float current = 0; // Measure in milli amps
  float power = 0;

  busVoltage = sensor219.getBusVoltage_V();
  current = sensor219.getCurrent_mA();
  power = busVoltage * (current/1000); // Calculate the Power

  Serial.print("Bus Voltage:   ");
  Serial.print(busVoltage);
  Serial.println(" V");

  Serial.print("Current:       ");
  Serial.print(current);
  Serial.println(" mA");

  Serial.print("Power:         ");
  Serial.print(power);
  Serial.println(" W");

  Serial.println("");

  delay(2000);
}
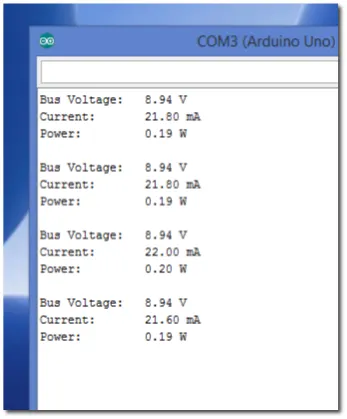
Verify Your Arduino INA219 Tutorial Output
Open your serial monitor. Your display should look like the display shown below: