Measuring Voltage: Arduino ADC Resolution and Accuracy
Making Better Sensor Measurements
Projects often start with us proving an idea. Perhaps we determine that we can measure and display temperature, we can control the fan speed, and we can accept user input.
Proving the concept however is a far cry from developing a project that performs well enough. Among the questions that should arise in the case of project that measures temperature, is whether or not the temperature measurement is good enough.
In the case of a sensor like an LM35 or a TMP36 that provides us a scaled DC voltage, we need to know whether or not the Arduino has enough resolution to make the measurement we want to make.
What is Resolution?
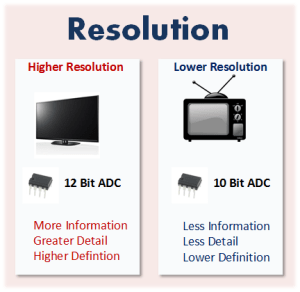
Think about an HDTV for moment. What distinguishes high definition television from the older televisions is that it provides more information to create a picture that has more detail. The amount of detail provided is described in a specification known as resolution. Thus an HDTV is said to provide more resolution than an older television.
Embedded into the Arduino microprocessor is an Analog to Digital Converter (ADC). This ADC takes an analog signal, measures it, and converts it to digital (or binary). The number of bits used to the digitally communicate the binary value represents the resolution.
In fact, ADCs are often described by their resolution. When we hear that a device has a 10 bit Analog to Digital Converter, we know that it uses ten digital bits to describe an analog value. Similarly, a 24 bit Analog to Digital converter will use 24 pieces of information to tell us what the analog value is.
Generally speaking, when a device has higher resolution, it provides more detail, information, or definition than the device that has lower resolution.
Is More Resolution Better?
Back to the HDTV… If all you ever watch are I Love Lucy reruns, buying that high end HDTV might not be the best decision.
That’s pretty much the same principle you should be applying when designing your projects. If more resolution doesn’t improve the project in a meaningful way, perhaps the investment is not justified.
In fact, adding layers of cost and complexity for no particular reason is something to avoid.
Putting Meaning to Arduino Resolution.
Possible Output Combinations
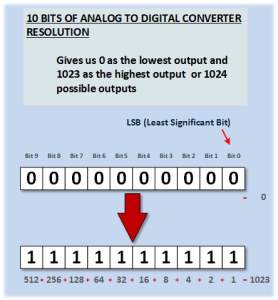
The ADC in your Arduino has 10 bits of resolution. In other words, it will return a value anywhere from ‘0000000000’ to ‘1111111111’. In decimal, that gives us 0 to 1023, or 1024 possible combinations.
The key is in understanding what the returned values mean.
Zero is easy. It means Zero.
The values 1 through 1023 require us to know what 1023 means.
For that we need to understand the Reference Voltage.
The Reference Voltage
When the Arduino processor measures voltage, it fundamentally compares the voltage being measured to a known value and outputs a binary number that represents a percentage of the full scale value.
In the default state, the Arduino processor compares the measured voltage to it’s 5V supply. Thus the accuracy of the measurement is very dependent on the accuracy of the reference being used. In another tutorial, we will use an external reference to improve both accuracy and a resolution.
For now though, we will assume the 5 volt supply to be a perfect 5 volts.
Whats very important here, is that you know that you will NEVER measure five volts as an output from the ADC when 5 volts is used as the reference.
Instead, you will measure something a little less than five volts.
The Value of 1023 and 1024
Referring to page 247 of the ATmega328 Datasheet, we find that the value of 1023 (expressed as 0x3FF) is equal to the reference voltage minus 1 LSB.
Another way to put this is that:
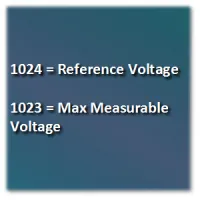
1024 = the Reference Voltage
1023 = the Maximum Measurable Voltage
The Maximum Measurable Voltage or 1023
Assuming a perfect 5 volt Vref, our maximum measurable value on the Arduino ADC works out to this:
Vmax = 5 * 1023 / 1024
Vmax = 4.9951 Volts
The Value of One LSB or ADC Resolution
Since we know Vmax, its a simple matter of applying a little more basic math to find the value of on LSB.
Value of 1 LSB= 4.9951 / 1023
Value of 1 LSB = 0.004882 (rounding up to 0.0049 works)
Note: dividing Vref by 1024 would’ve given us the same result.
Converting The ADC Output to a Voltage Value
As you examine sketches from around the internet, you’re going to see the conversion implemented differently. In some cases you will see 1023 used and in others 1024 used. Absent studying the code, I can not tell you whether their doing right or wrong, or whether, given the application, it makes much of a difference.
That said, the formula that I suggest that you routinely apply is the one that comes from the manufacturer datasheet. It looks like this:
Binary ADC Output Value = Vin x 1024 / Vref
Lets test that by substituting the maximum measurable voltage for Vin and 5 volts for Vref. You will see that.
1022.99 = 4.9951 x 1024/5
( The reason its not a clear 1023 is because we rounded of the result when we calculated Vmax )
Accuracy of the Arduino Analog Measurements
If you do everything perfect (which is a topic by itself) and the ONLY area of measurement uncertainty is in your Arduino, then you can rely solely upon the Atmel microprocessor specifications.
For the UNO, the stated absolute accuracy of the ADC is +/-2 LSB.
Stated another way, the accuracy of the ADC is +/- twice the value of the Least Significant Bit. Thus in the case of our perfect 5 volt supply, the accuracy of the Arduino is plus or minus 9.8 mV.
Throw in the fact that this is all based on an assumption about the the value of VCC and that we think everything else in our installation is perfect, the accuracy of our Arduino voltage measurement can easily be much worse than +/- 10 mV.